

In this final post of my two-part series about the GoAccess log analysis tool, I'll explain how to serve real-time HTML reports securely using Nginx, at a subdomain of the monitored website.
If you haven't already read the first part yet (and you don't already use GoAccess), you might like to read that first, to learn how to install and use GoAccess for CLI and static HTML web analytics reports.
Pre-requisites
As per the first part of this guide, it'll be most relevant to you if:
- You are using Debian, Ubuntu (or Raspbian) for your server.
- It's your server and you have an account with
sudorights.
Additionally, for the more-advanced usage explored in this post, I assume:
- You have GoAccess installed and working on your server.
- You've already set up TLS for your site, perhaps using a free certificate from Let's Encrypt.
- You're happy to setup a new subdomain (or domain) for accessing your web statistics at - and to point DNS for it at your existing server. For example, if your
access.logis for www.myblog.com, you could use goaccess.myblog.com to host the real-time statistics in the same Nginx instance.
Sounds good? Then let's go!
Real-time HTML reports
We looked at how to use GoAccess to generate static one-off HTML reports on the command line, in the first post of this two-part series.
Although static reports can be very useful, wouldn't it be great to have a live report available, which updated itself automatically as visitors hit the monitored site (without needing to refresh the page)? That's what we'll be setting up in this article.
Let's run through what we'll need:
- A new subdomain for accessing the report at - e.g. goaccess.myblog.com - with a TLS certificate (perhaps you could add a SAN entry for goaccess.myblog.com next time you renew your certificate for www.myblog.com?).
- A new virtual host / server block in our Nginx config for goaccess.myblog.com, restricted to local access only. (You don't want to share your report with the whole world!)
- A
systemdunit file to run GoAccess as a service automatically from system startup.
Creating a certificate for your new 'goaccess' subdomain is left as an exercise for the reader, but there are plenty of guides out there on how to get your own auto-renewing certificates from Let's Encrypt, completely free of charge.
Throughout this post, I'll use some fictional examples:
- www.myblog.com represents the monitored domain - i.e. the existing Nginx site/vhost creating the access log that you want to report on.
- goaccess.myblog.com represents a new (sub)domain where your real-time report will live at.
Be sure to replace these examples with your actual (sub)domain names if you copy and paste the sample configs I've provided!
As well as serving the report HTML, we will also configure Nginx to reverse-proxy the websocket server that's used to update the report in real-time.
Create a location for the report file
First off, let's create a folder for the web root of goaccess.myblog.com. This folder is where GoAccess will output the report.html to, for Nginx to serve at goaccess.myblog.com.
sudo mkdir -p /var/www/goaccess
This will be the folder where our GoAccess service will write the report.html file to.
It will also be the folder where Nginx will serve the file from.
Systemd setup
We want to run GoAccess as a service and start it automatically at bootup.
- Create a new custom unit file:
sudo nano /etc/systemd/system/goaccess.service
- Paste in the config below, updating the following items to match your own setup:
/var/log/nginx/access.logis the path to your access loggoaccess.myblog.comis the subdomain for your real-time statistics (we'll configure Nginx for this in the next section). Make sure to update both--ws-urland--originitems to reflect your actual stats (sub)domain./var/www/goaccessis the web root folder that you created at the end of the previous section
[Unit]
Description=GoAccess real-time web log analysis
After=network.target

[Service]
Type=simple

ExecStart=/usr/local/bin/goaccess -f /var/log/nginx/access.log \
          --real-time-html --ws-url=wss://goaccess.myblog.com:443/ws \
          -o /var/www/goaccess/report.html --port=7890 \
          --config-file=/usr/local/etc/goaccess/goaccess.conf \
          --origin=https://goaccess.myblog.com

ExecStop=/bin/kill -9 ${MAINPID}
WorkingDirectory=/tmp

NoNewPrivileges=true
PrivateTmp=true
ProtectHome=read-only
ProtectSystem=strict
SystemCallFilter=~@clock @cpu-emulation @debug @keyring @memlock @module \
                  @mount @obsolete @privileged @reboot @resources @setuid \
                  @swap @raw-io

ReadOnlyPaths=/
ReadWritePaths=/proc/self
ReadWritePaths=/var/www/goaccess

PrivateDevices=yes
ProtectKernelModules=yes
ProtectKernelTunables=yes

[Install]
WantedBy=multi-user.target
- Refresh
systemd, start the service and enable it to run automatically at bootup:
# update systemd
sudo systemctl daemon-reload

# start the service
sudo systemctl start goaccess

# enable it to start automatically
sudo systemctl enable goaccess

# wait a minute or so, then use this to check its status
sudo systemctl status goaccess
If all is well, you should see output similar to this:
goaccess.service - GoAccess real-time web log analysis
   Loaded: loaded (/etc/systemd/system/goaccess.service; enabled; vendor preset: enabled)
   Active: active (running) since ...
If there are errors showing, you can use sudo journalctl -u goaccess to see what's gone wrong.
Nginx configuration
Because we have a TLS certificate for goaccess.myblog.com, we can also secure the websocket server using Nginx this way; it means we don't need to configure GoAccess itself for TLS, yet we still get a secure websocket connection (wss:) from the browser. Neat, eh?
By using Nginx to serve the HTML report and reverse-proxy the websocket server, we can keep all the TLS config in Nginx where it belongs. It also means we don't need to open a separate port for the websocket server (e.g. 7890) - both HTTPS and secure websockets will be accessible at port 443.
Most Nginx setups use folders for including extra config files in the main configuration. This separation helps to keep things easy to manage.
For example, your main Nginx configuration file, e.g. /etc/nginx/nginx.conf, might contain the following lines towards the bottom of its http block:
include /etc/nginx/conf.d/*.conf;
include /etc/nginx/sites-enabled/*;
Those lines mean that any files in /etc/nginx/conf.d folder with an extension of .conf will be included in the main config.
Also, any files in the /etc/nginx/sites-enabled folder will be included.
The best way to manage virtual hosts is to save each host's config in the /etc/nginx/sites-available folder:
- The
sites-availablefolder is for storing all of your vhost configurations, whether or not they're currently enabled. - The
sites-enabledfolder contains symlinks to files in thesites-availablefolder. This allows you to selectively disable vhosts by removing the symlink.
Let's make the necessary changes to our Nginx config for goaccess.myblog.com.
- Edit the main
nginx.conffile, adding the following somewhere in thehttpblock:
map $http_upgrade $connection_upgrade {
    default upgrade;
    '' close;
}
- Create a config file for our new subdomain:
# replace with your actual stats domain name
sudo nano /etc/nginx/sites-available/goaccess.myblog.com
- Paste in the config below and amend as per the comments:
upstream gwsocket {
    server 127.0.0.1:7890;
}

server {
    listen 80;

    # replace with your actual domain
    server_name goaccess.myblog.com;

    # and again
    return 301 https://goaccess.myblog.com$request_uri;
}

server {
    listen 443 ssl http2;

    # replace with your actual domain
    server_name goaccess.myblog.com;

    # if you chose a different location for the webroot, use it here
    root /var/www/goaccess;

    # update these values to wherever your cert and key are
    ssl_certificate /path/to/your/certificate.pem;
    ssl_certificate_key /path/to/your/keyfile.key;

    # update to match your local network, to allow access from your LAN
    allow 192.168.1.0/24;
    deny all; # block rest of the world

    access_log /var/log/nginx/goaccess-access.log;
    error_log /var/log/nginx/goaccess-error.log warn;

    location / {
        try_files $uri/report.html =404;
    }

    location /ws {
        proxy_http_version 1.1;
        proxy_set_header Upgrade $http_upgrade;
        proxy_set_header Connection $connection_upgrade;
        proxy_pass http://gwsocket;
        proxy_buffering off;
        proxy_read_timeout 7d;
    }
}
- Apply the new config:
# create a symlink to activate the new virtual host
sudo ln -s /etc/nginx/sites-available/goaccess.myblog.com /etc/nginx/sites-enabled/goaccess.myblog.com

# test the new nginx config is valid
sudo nginx -t

# re-load nginx to apply the new config
sudo nginx -s reload
Locking things down
The allow and deny directives in the Nginx config above are to make sure that only you can view your statistics, from your local network.
If you'd like to whitelist other friendly subnets - perhaps you run a VPN server to dial in - then just add the appropriate subnet as another allow.
You can whitelist individual public IPs too, if you like:
    # update to match your local subnet, to allow access from your LAN
    allow 192.168.1.0/24;

    # allow another local subnet, such as VPN-connected clients
    allow 10.20.30.0/24;

    # allow a specific public IP
    allow 172.217.169.36;

    # block rest of the world
    deny all;
If you make changes to your config, just use sudo nginx -t to test it's valid, then sudo nginx -s reload to apply.
The final result
If all has gone well, when you point your browser to your new statistics subdomain, you should get something like this:
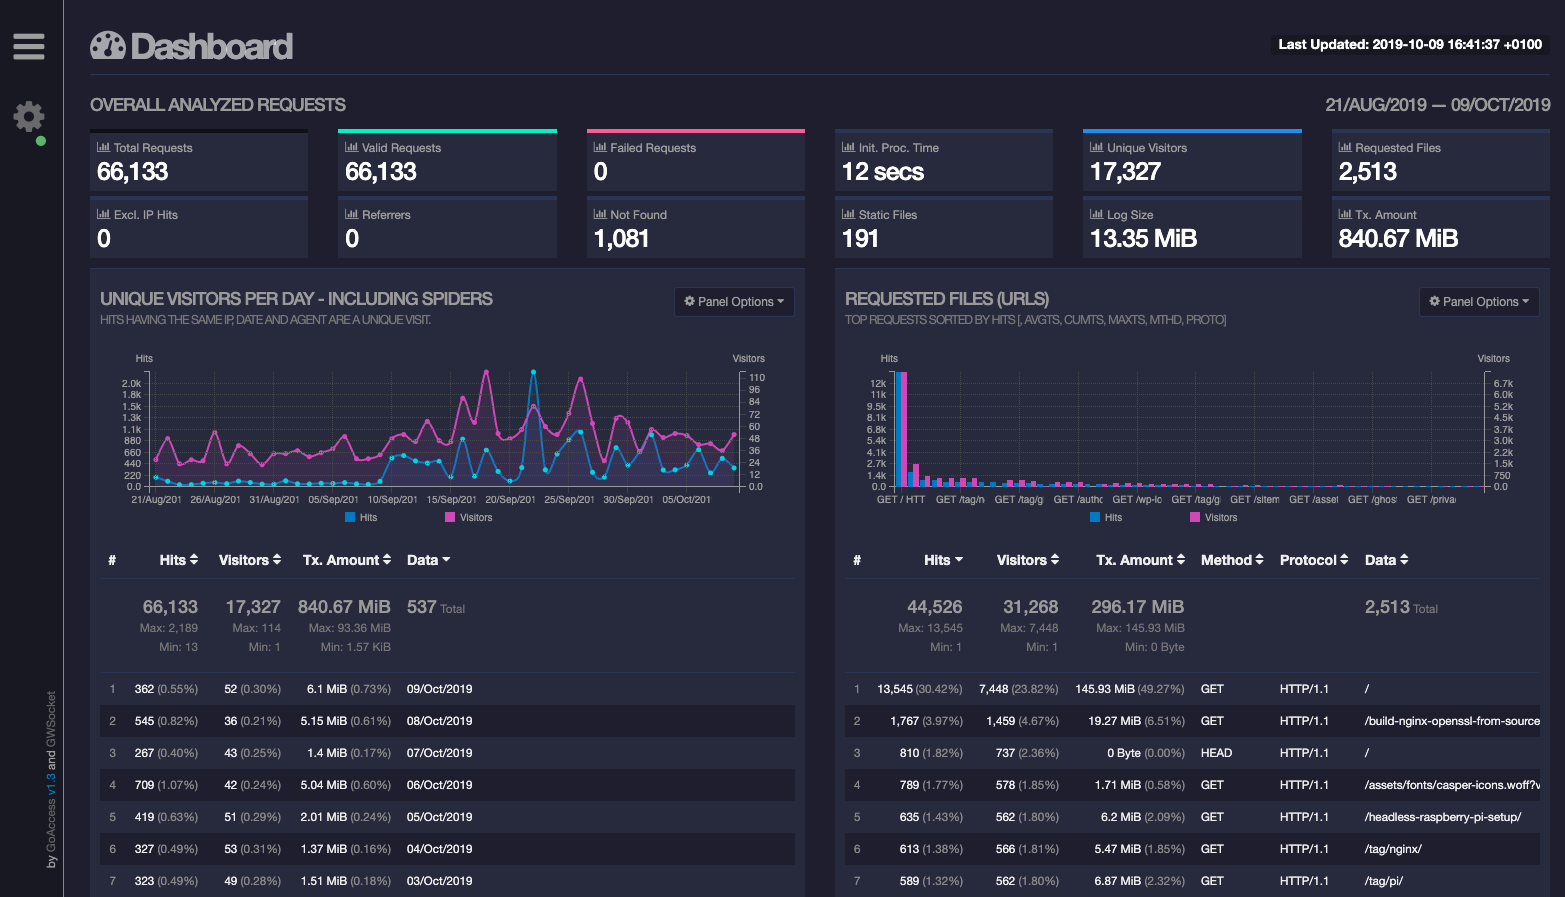
That little green spot next to the settings cog at the top-left of the dashboard indicates that the websocket connection is working, so the report will be updated in real-time, as visitors hit your site (and Nginx updates the access log).
If you browse some pages on the monitored website from another window/device, you should see the statistics update straight away. Nice.
A minor hiccup
There is a bug with the report in GoAccess v1.3 (the latest stable version at the time of writing): the 'Last Updated' timestamp at the top-right never updates when a websocket update is received. The statistics are updated, but the last updated time never changes. The time shown indicates when thegoaccessservice was started and the log was parsed. I've raised an issue on Github about this and I'll update the post when a solution is identified.
You should confirm that you cannot reach your stats site via an Internet/external IP, e.g. test via 4G from your mobile; you should only be able to see the report from your LAN.
What does it all mean?
For more info on the various panels - and extra ones that you can enable via GoAccess configuration, please see the GoAccess docs.
With some tweaks to your Nginx and GoAccess configs, you can customise your statistics further: e.g. measure the time taken to serve different resources from your site, or track multiple virtual hosts in the same log.
Conclusion
Rather than including Google Analytics or similar code in all of your pages, you can get some really useful insights from a bog-standard access log.
GoAccess is a great way to get some basic but valuable analytics to help you manage your website(s), without compromising your users' privacy.
If you've found this article useful or have a suggestion, I'd love to hear from you in the comments below.
Photo by Annie Spratt on Unsplash